-
[Fiori] #8 Filter와 SortSAP/UI 2025. 11. 16. 13:23
검색 Filter
- sap.ui.model.Filter 클래스 사용
- 일반적으로 Table이나 List의 binding에 적용하여 화면에 표시되는 항목을 필터링한다.
- 빈 배열을 적용하게 되면 초기화가 된다.
- filter 조건은 view 또는 controller에서 적용 가능
- filter 조건들은 기본으로 AND 조건으로 묶이지만 → OData 서버가 해석할 때 OR로 처리하는 경우가 있음.
View에서 filter 적용
<Table id="idProductsTable"
    sticky="HeaderToolbar,ColumnHeaders"
    inset="false"
    items="{
            path: '/Products',
            filters : [{
                path : 'ProductName',
                operator : 'Contains',
                value1 : 'Queso'
            },{
                path : 'UnitsInStock',
                operator : 'NE',
                value1 : '22'
            }
        }"
    class="sapFDynamicPageAlignContent"
    width="auto">
Controller에서 filter 적용
onSearch: function() {
    let sValue = this.byId("inputProductName").getValue();

    let aFilter = []; // 필터들을 넣을 배열 선언

    // 1번 필터 생성
    // new Filter(path, operator, value1, value2);
    let oFilter = new Filter("ProductName", "Contains", sValue);

    // 2번 필터 생성
    // new Filter({
    //        path: "",
    //        operator: ,
    //        value1: "",
    //        value2: ""
    //    })
    if(sValue) {
        aFilter.push(oFilter); // 배열에 필터 객체를 넣는다.
        aFilter.push(new Filter({
            path: "UnitsInStock",
            operator: FilterOperator.BT,
            value1: "10",
            value2: "100"
        }));
    }

    // 테이블에 필터 적용
    this.byId("idProductsTable").getBinding("items").filter(aFilter);
},
※ filter 조건들을 AND/OR 조건 변경 시 Filter 안에 Filters 배열을 넣어서 처리해야 한다.
let oFilter = new Filter({
    filters: [
        new Filter("City", FilterOperator.EQ, "Seoul"),
        new Filter("City", FilterOperator.EQ, "Busan")
    ],
    and: false // false = OR 조건, true = AND 조건
});

this.byId("idProductsTable").getBinding("items").filter(oFilter);
Filter 연산자 종류
연산자 의미 예시 EQ 같음 new Filter("Age", FilterOperator.EQ, 20) NE 같지 않음 new Filter("City", FilterOperator.NE, "Seoul") LE 이하 new Filter("Age", FilterOperator.LE, 30) LT 미만 new Filter("Age", FilterOperator.LT, 30) GE 이상 new Filter("Age", FilterOperator.GE, 30) GT 초과 new Filter("Age", FilterOperator.GT, 18) BT value1과 value2 사이 new Filter("Age", FilterOperator.BT, 0, 100) Contains 포함 new Filter("CustomerName", FilterOperator.Contains, "김") StartsWith 시작함 new Filter("CustomerName", FilterOperator.StartsWith, "장") * sap.ui.model.FilterOperator에서 operator 확인 후 사용
Sort
- sap.ui.model.Sorter 클래스 사용
- Sort조건은 view 또는 controller에서 적용 가능
- 여러 Sorter를 배열로 넣으면 순차적으로 정렬
View에서 Sort 적용
<Table id="idProductsTable"
    sticky="HeaderToolbar,ColumnHeaders"
    inset="false"
    items="{
            path: '/Products',
            sorter: [{
                path : 'SupplierID',
                descending : true
            },{
                path : 'UnitsInStock',
                descending : false
            }]
        }"
    class="sapFDynamicPageAlignContent"
    width="auto">
Controller에서 Sort 적용
onSearch: function() {
    let sValue = this.byId("inputProductName").getValue();

    let aSorter = []; // 정렬 객체들을 넣을 배열 선언


    // new Sorter("필드명") // 기본 오름차순
    // new Sorter("필드명", false) // 오름차순
    // new Sorter("필드명", true) // 내림차순
    aSorter.push( new Sorter("SupplierID", true) );


    // 테이블에 sort 적용
    this.byId("idProductsTable").getBinding("items").sort(aSorter);
},
Input에 도움말 적용
Input 폼 옆에 도움말 버튼이 생성됨.
<Input id="inputProductName"
    showValueHelp="true"
    valueHelpRequest="onValueHelpRequest"
    placeholder="Product Name"
    />
onValueHelpRequest: function() { MessageBox.information("Value Help 오픈!"); }
[실습] 검색 필터와 정렬 적용하기 + 도움말
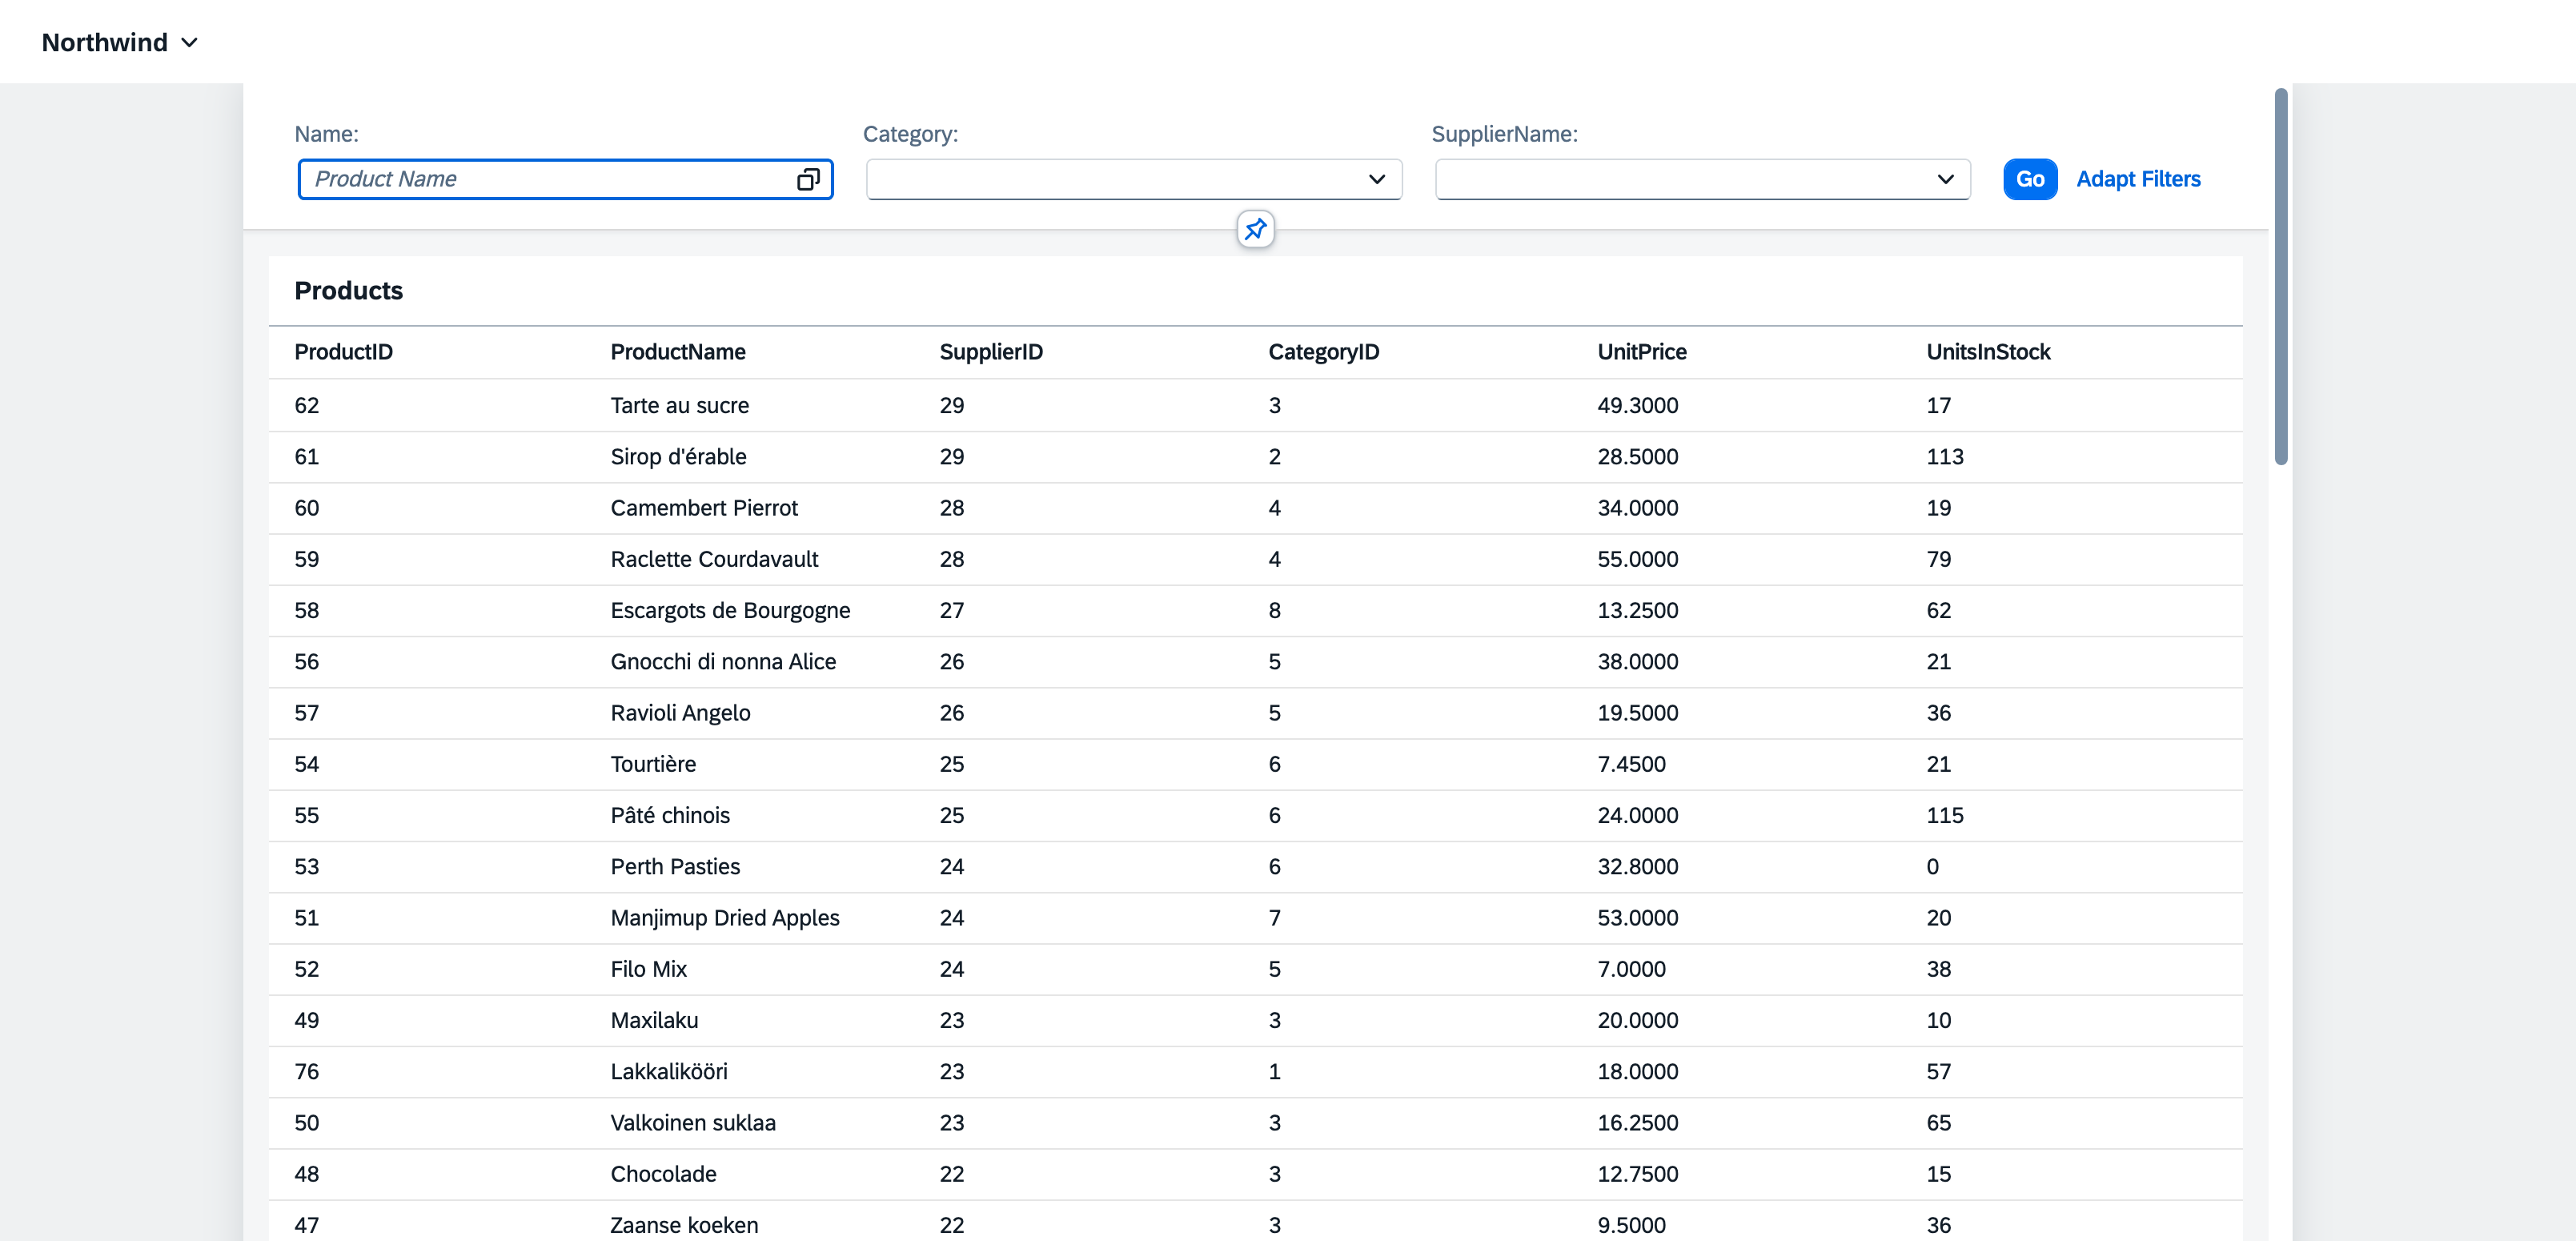
<mvc:View controllerName="ycl2project09.controller.MainView"
    xmlns:mvc="sap.ui.core.mvc"
    xmlns:f="sap.f"
    xmlns:core="sap.ui.core"
    xmlns:fb="sap.ui.comp.filterbar"
    xmlns="sap.m">
    <f:DynamicPage id="dynamicPageId" headerExpanded="{/headerExpanded}" toggleHeaderOnTitleClick="{/titleClickable}">
    <!-- DynamicPage Title -->
    <!-- DynamicPage Header -->
    <f:header>
        <f:DynamicPageHeader pinnable="true">
            <fb:FilterBar id="filterbar" persistencyKey="myPersKey" useToolbar="false" search=".onSearch" filterChange=".onFilterChange" afterVariantLoad=".onAfterVariantLoad">
                <fb:filterGroupItems>
                    <fb:FilterGroupItem name="Name" label="Name" groupName="Group1" visibleInFilterBar="true">
                        <fb:control>
                            <Input id="inputProductName" showValueHelp="true" valueHelpRequest="onValueHelpRequest" placeholder="Product Name" />
                        </fb:control>
                    </fb:FilterGroupItem>
                    <fb:FilterGroupItem name="Category" label="Category" groupName="Group1" visibleInFilterBar="true">
                        <fb:control>
                            <MultiComboBox
                                name="Category"
                                selectionChange=".onSelectionChange"
                                items="{
                                    path: '/ProductCategories',
                                    templateShareable: true
                                }"
                            >
                                <core:Item key="{key}" text="{name}"/>
                            </MultiComboBox>
                        </fb:control>
                    </fb:FilterGroupItem>
                    <fb:FilterGroupItem name="SupplierName" label="SupplierName" groupName="Group1" visibleInFilterBar="true">
                        <fb:control>
                            <MultiComboBox
                                name="SupplierName"
                                selectionChange=".onSelectionChange"
                                items="{
                                    path: '/ProductSuppliers',
                                    templateShareable: true
                                }"
                            >
                                <core:Item key="{key}" text="{name}"/>
                            </MultiComboBox>
                        </fb:control>
                    </fb:FilterGroupItem>
                </fb:filterGroupItems>
            </fb:FilterBar>
        </f:DynamicPageHeader>
    </f:header>
    <f:content>
        <Table id="idProductsTable"
                sticky="HeaderToolbar,ColumnHeaders"
                inset="false"
                items="{
                        path: '/Products',
                        sorter: [{
                            path : 'SupplierID',
                            descending : true
                        },{
                            path : 'UnitsInStock',
                            descending : false
                        }]
                    }"
                class="sapFDynamicPageAlignContent"
                width="auto">
                <!--
                filters : [{
                            path : 'ProductName',
                            operator : 'Contains',
                            value1 : 'Queso'
                        },{
                            path : 'UnitsInStock',
                            operator : 'NE',
                            value1 : '22'
                        }
                -->
            <headerToolbar>
                <Toolbar>
                    <Title text="Products" level="H2"/>
                </Toolbar>
            </headerToolbar>
            <columns>
                <Column >
                    <Text text="ProductID" />
                </Column>
                <Column >
                    <Text text="ProductName" />
                </Column>
                <Column >
                    <Text text="SupplierID" />
                </Column>
                <Column >
                    <Text text="CategoryID" />
                </Column>
                <Column >
                    <Text text="UnitPrice" />
                </Column>
                <Column >
                    <Text text="UnitsInStock" />
                </Column>
            </columns>
            <items>
                <ColumnListItem>
                    <cells>
                        <Text text="{ProductID}" />
                        <Text text="{ProductName}" />
                        <Text text="{SupplierID}" />
                        <Text text="{CategoryID}" />
                        <Text text="{UnitPrice}" />
                        <Text text="{UnitsInStock}" />
                    </cells>
                </ColumnListItem>
            </items>
        </Table>
    </f:content>
    <!-- DynamicPage Footer -->
    <f:footer>
        <OverflowToolbar>
            <ToolbarSpacer/>
            <Button type="Accept" text="Accept"/>
            <Button type="Reject" text="Reject"/>
        </OverflowToolbar>
    </f:footer>
</f:DynamicPage>

</mvc:View>
sap.ui.define([ "sap/ui/core/mvc/Controller", "sap/ui/model/Filter", "sap/ui/model/FilterOperator", "sap/ui/model/Sorter", "sap/m/MessageBox" ], (Controller,Filter,FilterOperator,Sorter,MessageBox) => { "use strict"; return Controller.extend("ycl2project09.controller.MainView", { onInit() { }, onSearch: function() { let sValue = this.byId("inputProductName").getValue(); // aFilter => [ new Filter, new Filter, .... ] let aFilter = []; // 필터들을 넣을 배열 선언 let aSorter = []; // 정렬 객체들을 넣을 배열 선언 // new Filter(path, operator, value1, value2); let oFilter = new Filter("ProductName", "Contains", sValue); if(sValue) { aFilter.push(oFilter); // 배열에 필터 객체를 넣는다. aFilter.push(new Filter({ path: "UnitsInStock", operator: FilterOperator.BT, value1: "10", value2: "100" })); } // new Sorter("필드명") // 기본 오름차순 // new Sorter("필드명", false) // 오름차순 // new Sorter("필드명", true) // 내림차순 aSorter.push( new Sorter("SupplierID", true) ); // 테이블에 필터 적용 this.byId("idProductsTable").getBinding("items").filter(aFilter); this.byId("idProductsTable").getBinding("items").sort(aSorter); }, onValueHelpRequest: function() { MessageBox.information("Value Help 오픈!"); } }); });getBinding("aggregationName")
컨트롤에 현재 적용되어 있는 바인딩(Binding 객체)을 가져오는 함수.
즉, 컨트롤이 “바인딩을 통해 데이터를 화면에 보여주는 구조”에 접근하는 함수.
this.byId("idProductsTable").getBinding("items").filter(aFilter);idProductsTable의 뷰 객체는
<Table>
<columns></columns>
<items> </items>
</Table>
이러한 구조를 가지고 있고 모델 바인딩은 items 안에 있는 컨트롤들이 되어있음.
그래서 getBinding("items")을 호출하여 items 안의 컨트롤들이 데이터 바인딩할 때 filter 조건에 맞는 데이터를 화면에 보여주게 됨.
'SAP > UI' 카테고리의 다른 글
[Fiori] #10 Chart (0) 2026.02.04 [Fiori] #9 Router (0) 2025.11.16 [Fiori] #7 데이터 바인딩 활용 실습 (1) 2025.11.15 [Fiori] #6 데이터 바인딩 (2) (0) 2025.11.12 [Fiori] #5 데이터 바인딩 (1) (0) 2025.11.12